

This requires a programme that can assign the data records from one table to the data records from the second table. For IDs and similar data, it is sufficient if only exact matches are found. However, for certain data, such as address data, a more complex approach is required. This is because names are often spelled differently, parts of them may be abbreviated or omitted entirely, or they may simply be misspelled. A programme for comparing two tables should, of course, take such discrepancies into account. One programme that can be used for this purpose is DedupeWizard.
To do so, follow the steps below:
- If you have not already done so, download DedupeWizard free of charge here. Install the program and request a trial activation. Then you can work with the program for one whole week without any restrictions.
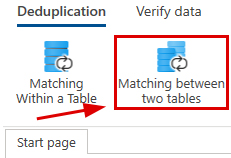
- The required function is 'Deduplication between two files'.
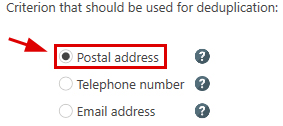
- After starting this function, you first have to select the matching criteria. The duplicate detection can be carried out based on the postal address, the telephone number or the email address. Let’s choose the postal address.
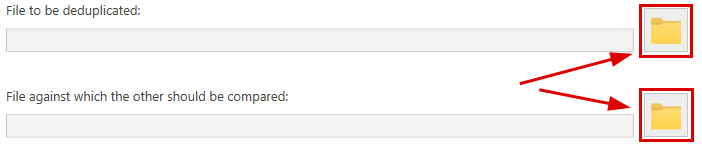
- After clicking on the 'Next' button, the next step is to open the two Excel files to be processed.
If you want to use a worksheet other than the first worksheet in this Excel file, then you can still select it later in the dialogue where you do the field assignment. - After opening of the Excel files, the program automatically leads you to the next step, the field assignment. There, the program has to be told in which columns it can find what information in the table, i.e., which column contains the street or name of the city. To do so, you have to select each data field from the table from the selection list with the column headings that fits best with the designation on the left.

The program automatically carries out a default field assignment using the column headings. Since we want to search for duplicates based on the postal address, we also have to indicate the respective columns from the table to be processed that contain the information for all of the components of the postal address. The results of the field assignment can be verified by using 'Verify field assignment’, which can be found on the right half of the screen. - To set the field assignment of the second table, click on the 'Next' button. The dialogue that appears looks exactly like the previous dialogue and is also used in the same way. Carry out the field assignment the same way as for the first table.
- With the 'Next' button, we come to the dialogue where the actual function can be configured. Here, the most important step is to set the threshold for the maximum allowed discrepancy between two addresses.
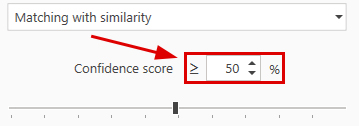
Furthermore, individual components of the postal address can be excluded from the comparison. In doing so, a column from the table to be processed has to be indicated, during the field assignment in the previous step, for each component of the postal address that should be included in the comparison. Note: The two tables used for the duplicate detection may have completely different structures. For example, the house number could be written in the same column as the street in one table, and in the other, this information could be indicated in two separate columns. The important thing is that all three columns are indicated in the field assignment for both these tables. - A click on the 'Next' button starts the matching. In no time at all, a summary of the results is displayed.

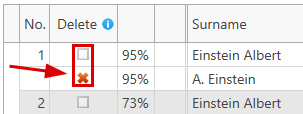
If the program has found duplicates in the processed table, a click on the 'OK' button takes you to the manual post-editing. Otherwise, reduce the threshold for the degree of matching and the re-start the comparison. - The ‘manual post-editing’ presents the results of the comparison in table form. Those records that should be deleted are marked with a red X, which can be removed if necessary or moved to a different record from the deuplicate group.
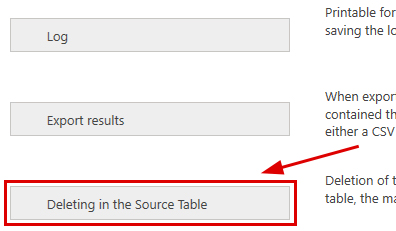
- Another click on the ‘Next’ button leads us to the dialogue with the functions used to transform the results. For example, we could delete the records marked with a deletion flag directly of the Excel file. All you need to do is click on the 'Delete in source file’ button.
You can also use DataQualityTools as well to execute a search for duplicates between two tables. This program offers much more possibilities than DedupeWizard, not only to find duplicates.
Note: There is a video tutorial available for DedupeWizard, introducing the user to the operation of the program based on the example of a duplicate detection within one table.
You can read about how to use DedupeWizard to search for duplicates within an address list in the article 'Remove Duplicates in Excel'.